My Little Girl
September 14, 2011 | Filed Under Baby, Children | 1 Comment
I am sure all of it will change very soon, but for now I love being the center of her world!
She certainly is mine.
Gone Surfing…
September 13, 2011 | Filed Under Landscape | 1 Comment
Today is my birthday.
I’m off for some surfing, shopping & sushi.
Happy Tuesday!
3 Steps To Make Eyes POP In Lightroom!
September 7, 2011 | Filed Under Children | 3 Comments
Recently, a good friend of mine has been calling from the Mainland with a lot of questions about Lightroom. Since I love my dear friend, Jen (who’s about to have a baby any day now), I thought I’d write this post for her. Sometimes it’s easier to understand by seeing than via phone or text:)
To really capture the magic of a portrait, you must be aware of light. Using light the right way is key in photography…and in my opinion, the most important thing! When taking a portrait, I am always aware of the direction the light is coming from. I look for the “catchlight” in the eyes. What is catchlight? It is the sparkle, the gleam, the reflection of light that makes the eyes shine. When you capture that catchlight just right, it can really add the WOW factor to a portrait. Of course, I never forget about expression, posing, background, etc. But light, and the way you use it to your advantage, is always number one.
Once the catchlight is effectively captured in camera, then you can move on to the next stage…Lightroom. There are so many programs out there to help with post-processing, but since I use, and love, Adobe Lightroom 3, I will explain how I use it to make eyes POP. (Pioneer Woman also wrote a great little article about making eyes POP in Photoshop.) Remember though, it’s more important to capture the right light in a subject’s eye ‘in camera’ than to try to add it later in post-production. That is the best way to truly capture beautiful eyes.
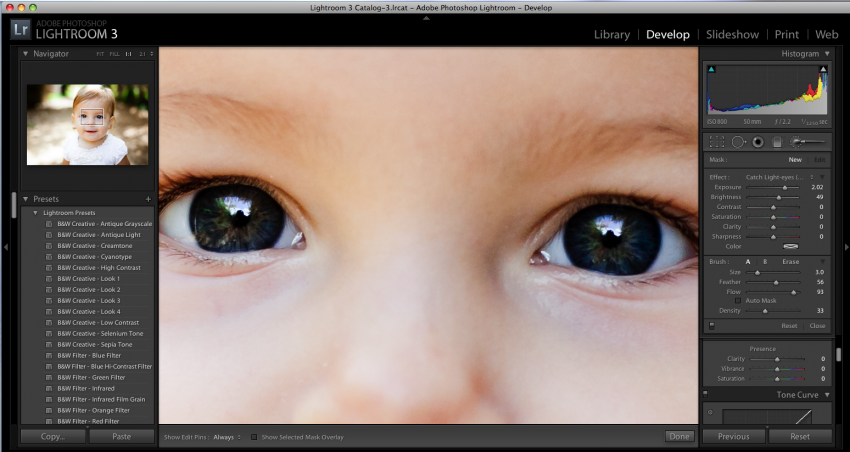
To make eyes POP in Lightroom, I do a couple of key adjustments using the Adjustment Brush (k) in the top right corner of the Develop Module.
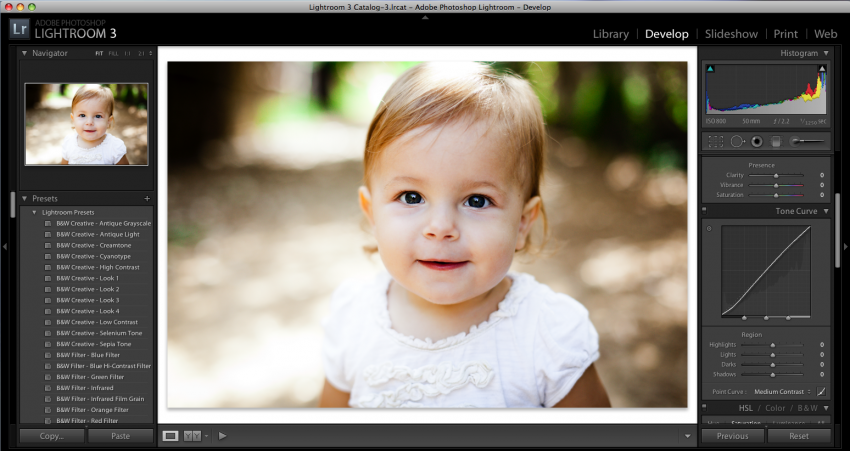
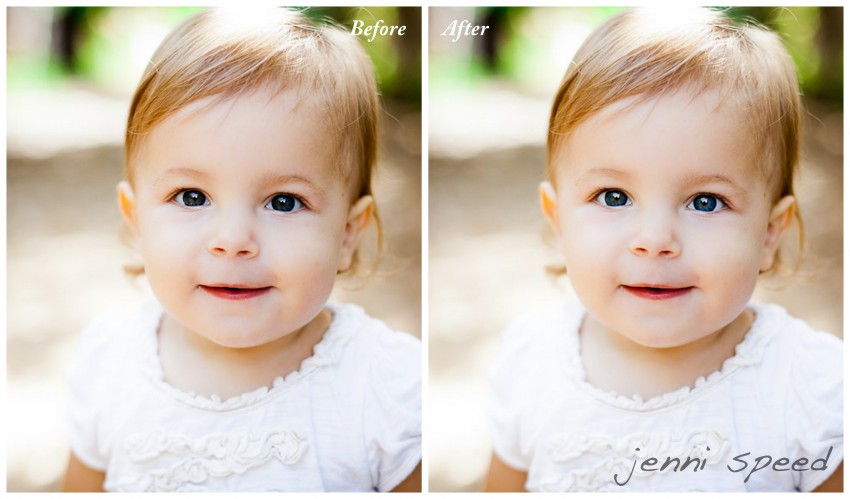
Above is my BEFORE photo, which is great by itself. The catchlight is actually quite bright. But let’s make it POP a little more in only 3 steps.
1-Enhance the catchlight in each eye. To do this, I zoom in to 1:1 so I can see the eyes up close. Then I set the brush exposure: 2.00, brightness: 50. Paint with the brush only over the natural catchlight in each eye. I have these settings saved as an Adjustment Brush preset as “catchlight.” Zoom out to make sure it looks right. You don’t want to over do it here so if it looks wrong, shave it down a bit or decrease the exposure.
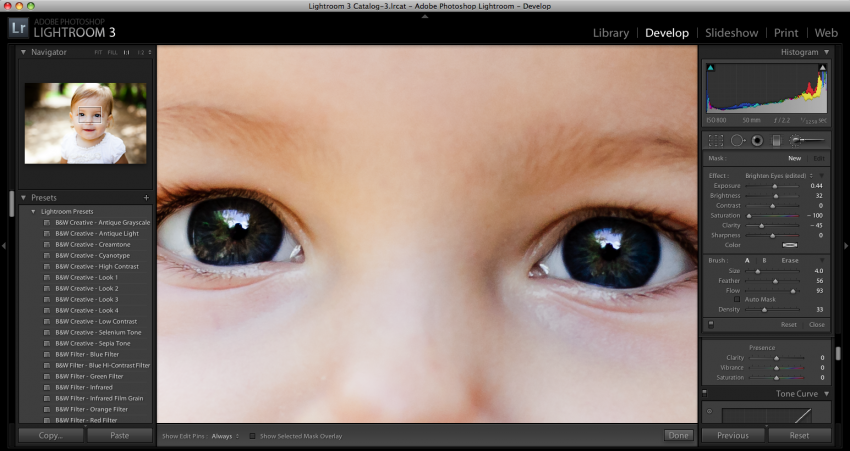
2-Brighten the whites of the eyes. Zoom in, then set the brush exposure: .44, brightness: 32, saturation: -100, clarity: -45. Paint with the brush over the whites of the eyes. This will brighten them up as well as reduce any redness. (BONUS-sometimes is makes a huge difference to take down the redness just below the bottom lashes too. Just set saturation to -30 and sweep along bottom of eyelashes.)
3-Enhance the irises. This is optional and I don’t often need to enhance the iris, but it can be useful. Set brush exposure: .40, contrast: 15, saturation: 100, clarity: 65. Paint over the irises in each eye. Adjust exposure to taste. You can also add color at this point.
That’s it! Your portrait will now have a stunning WOW factor with enhanced catchlight in the eyes.
You can see below that the difference is subtle, but it does add the right amount of sparkle.
Hopefully this helps, Jen. Good luck with Lightroom…and your new baby!

